Document Scanner in SwiftUI
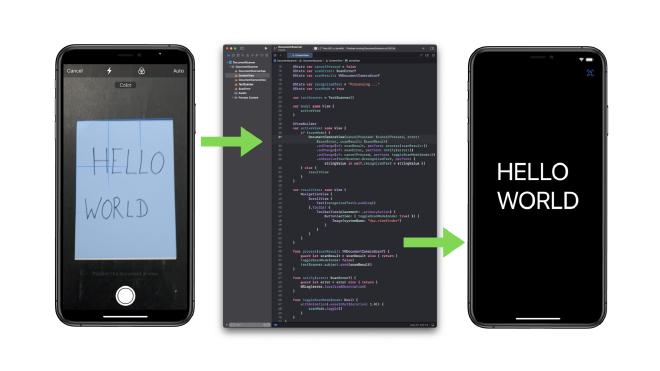
Extracting Text From Documents Using Artificial Intelligence #

In this tutorial we are going to learn how to scan documents and extract the containing text with Document Segmentation and Optical Character Recognition.
A fully working iOS application which is provided as source code will help us understand which of Apples frameworks and specific classes are required to fulfil this task.
Introduction #
Phones are not just phones any more, amongst other things, they became our offices. Not many of my generation (am a bit older …) would have thought that todays smart phones can replace so many other devices.
Amongst those devices are document scanners.
In 2017, Apple introduced a document scanner in Notes, Mail, Files and Messages. It provides cleaned up document “scans” which are perspective corrected and evenly lit.
Since WWDC 2019, we, as developers can leverage that feature in our apps as well!
Time for me to sit down and figure out the most minimal but fully working SwiftUI-app possible. The result is this tutorial and the accompanying app which source code can be downloaded.
Here is a demo on how the app works:
The complete Xcode project can be downloaded following this link.
At the time of writing this tutorial, my setup is the following:
- MacBook Pro, 16-inch, 2021, M1 Max
- macOS Monterey, Version 12.0.1
- Xcode, Version 13.1
Here is what we are going to cover:
- Overview of Frameworks
- Document Segmentation
- Optical Character Recognition
- Reference Application Walkthrough
- Optimisations and Best Practices
- Conclusion
Let’s get started.
Overview #
There are basically two steps necessary to accomplish our task.
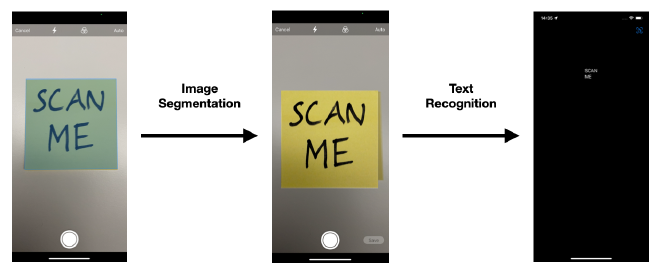
First, we need to “find” the document in our image: Document Segmentation.
Second, we need to “find” the characters and extract text: Optical Character Recognition.
Fortunately, Apple provides us with plenty of ready made code that we can just grab and glue together to make a nice and shiny app from it.
The graphic below shows the main classes and frameworks involved.

However, there are only two classes which are the most important ones and that we are going to focus on.
The first one is VNDocumentCameraViewController:
A view controller that shows what the document camera sees.
And the second one is VNRecognizeTextRequest:
An image analysis request that finds and recognises text in an image.
Additionally we use a bit of Combine in between to “glue” things together.
For user interaction we are going to use SwiftUI.
Document Segmentation #
Let’s focus on document segmentation to get to know the background we need to understand in order to implement our app.
Wikipedia defines document segmentation as:
In digital image processing and computer vision, image segmentation is the process of partitioning a digital image into multiple segments (sets of pixels, also known as image objects).
In general, Apple provides us with VNRequest:
The abstract superclass for analysis requests.
VNRequests offers number of requests for document analysis, like
- barcode detection
- text recognition
- contour detection
- rectangle detection
- NEW for 2021: document segmentation detection
The last one is the one we need. Its specific implementation is VNDetectDocumentSegmentationRequest:
An object that detects rectangular regions that contain text in the input image.
It is a machine learning based detector which runs in realtime on devices with Apples Neural Engine. It provides a segmentation mask and corner points and is being used in VNDocumentCameraViewController.
In the past we have had to use rectangle detection with the more general VNDetectRectanglesRequest in order to segment a document:
An image analysis request that finds projected rectangular regions in an image.
It uses a traditional algorithm that is running on the CPU. It detects edges and looks for intersections to form a quadrilateral with the corner points only. It can detect N-rectangles including nested rectangles.
In comparison, the new VNDetectDocumentSegmentationRequest is using a machine learning based algorithm that is running on the Neural Engine, GPU or CPU. It has already been trained on documents, labels, signs, including non-rectangular shapes. It finds one document and provides us with the segmentation mask and the corner points.
For our convenience, we don’t even have to use VNDetectDocumentSegmentationRequest directly, because it is already encapsulated in VNDocumentCameraViewController:
A view controller that shows what the document camera sees.
We have everything we need to process with the next step: extracting the text from the document.
Optical Character Recognition #
Let’s get help from Wikipedia again to give us a general understanding of optical character recognition (OCR):
Optical character recognition or optical character reader (OCR) is the electronic or mechanical conversion of images of typed, handwritten or printed text into machine-encoded text, whether from a scanned document, a photo of a document, a scene-photo (for example the text on signs and billboards in a landscape photo) or from subtitle text superimposed on an image (for example: from a television broadcast)
Until 2019 we would have had to use VNDetectRectanlgesRequest and VNTextObservation and then perform multiple steps to extract the text:
- Iterate over character boxes in the observation.
- Train CoreML model to do character recognition.
- Run model on character box.
- Threshold agains possible garbage results.
- Concatenate characters into string.
- Fix recognised characters into string.
- Fix recognised words based on dictionary and other probability heuristics for character pairs.
That’s a lot of stuff we had to do, but not any more …
Thanks to VNRecognizeTextRequest, all the steps have been reduced to by what’s basically a one-liner.
Well, I wish there would be more to write about it, but it is really that simple. We have everything at hand now to write an app, which I have already done for you.
On to the next chapter where I will provide an overview of the Xcode project, point out the classes that do all the work and also walk you through a few features.
Reference Application Walkthrough #
Everything starts in Xcode with the standard SwiftUI-application. After I have added all the necessary code, the project structure looked as follows:

The two most important classes that do all the work are DocumentCameraView and TextScanner.
We need DocumentCameraView in order to “wrap” VNDocumentCameraViewController which is a UIKit-class and not native to SwiftUI.
I have as described this in my tutorial:
https://itnext.io/using-uiview-in-swiftui-ec4e2b39451b
The “result” of the VNDocumentCameraViewController is VNDocumentCameraScan.
At this point the TextScanner-class comes into play which takes the VNDocumentCameraScan for further processing, which is extracting the text data from the scanned image.
In order to keep the code as simple as possible, I have glued everything together in the main view which is in ContentView. I don’t find it necessary to introduce a fancy app-architecture for an app which is supposed to be as easy as possible.
Now it is time to introduce a few features of the app which come with the VNDocumentCameraViewController.
There are several options in the camera view that will optimise the performance and accuracy of our app.
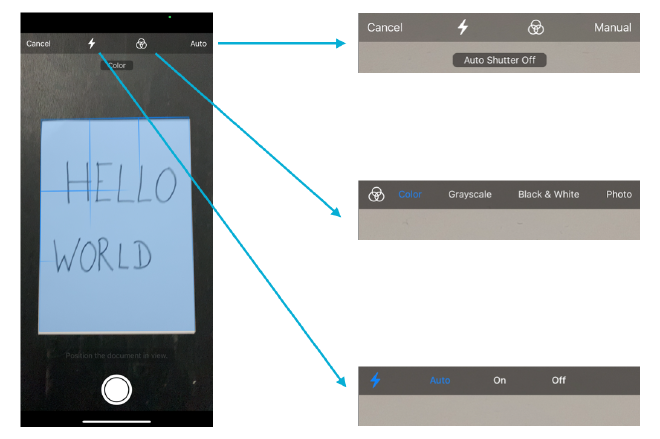
- We can set the flash to auto-mode (default), constantly on or off.
- The options for the document mode are color (default), grayscale, back and white and photo.
- The shutter behaviour can also be changed. Whenever the camera “thinks” that it has recognised a document it will automatically “press” the shutter (default). In case we really want to press the shutter button ourselves, this needs to be set to “Manual”.
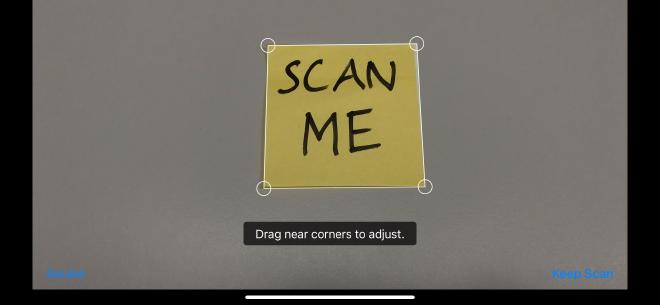
When the shutter is being pressed in manual mode, the document will not be segmented automatically. This segmentation has to be done manually by ourselves by adjusting the corner points.
When “Cancel”-button has been pressed we go to the result view, which, when no picture has been taken is empty.
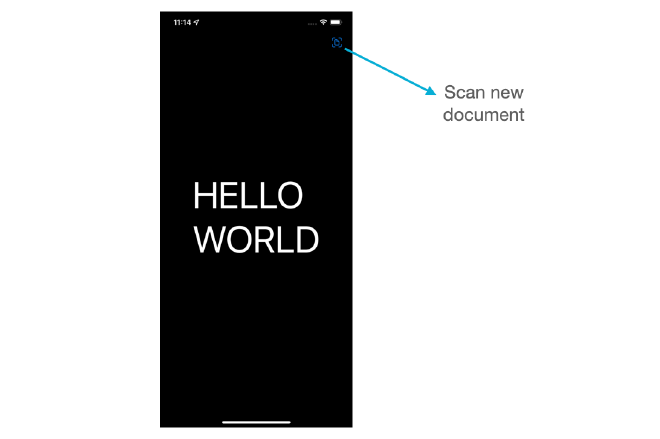
In the result view we get back into the camera view by pressing the “Scan”-icon in the top-right corner.
And that’s about it. Let’s wrap it up.
Conclusion #
What a ride. Starting from the basic building blocks we need, document segmentation and text recognition, we learned all the classes and frameworks that we need to build an app.
Then we worked through a fully working iOS app which can be adapted and extended for any specific use case and requirements that you might want to realise.
I sincerely hope this will help you jump-start your next big app idea!
The complete Xcode project can be downloaded following this link.
Thank you for reading!
- If you enjoyed this, please follow me on Medium
- Buy me a coffee to keep me going
- Support me and other Medium writers by signing up here
https://twissmueller.medium.com/membership