Face Detector with VisionKit and SwiftUI
Detecting Faces and Face Landmarks in Realtime #
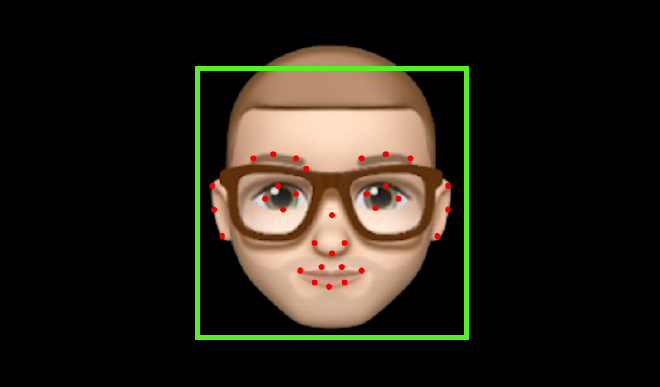
Welcome to another article exploring Apples Vision and VisionKit Framework. I have already written two articles and code samples that are using these frameworks.
The first one that I have written in the past is “Barcode Scanner in SwiftUI”.
The second article is quite young and is called “Document Scanner in SwiftUI”.
Now, it is the moment for something new and even more fun.
Introduction #
Exploring the existing frameworks on Face Detection and Face Landmark Detection is something I wanted to do for a long time.
I find it fascinating that some clever algorithms can detect and track faces even when wearing glasses or masks.
Thanks to Apple we can have all this functionality right on our phones. Nothing has to be sent to any servers for processing. That would be too slow anyways.
We want everything in real-time, right on our device.
Therefore, I have started this project which resulted in this article and a fully working iOS app. You can download the accompanying Xcode project and use the source code freely in your own projects.
Let’s talk first what the app is actually doing.
App Features #
The title states it already that this article is about Face Detection and Face Landmark Detection. The app does a little more though.
Apples Vision and VisionKit Frameworks deliver all the algorithms out of the box and I have included the following features into the sample app:
- Detect and visualise bounding box
- Detect and visualise face landmarks
- Determine image capture quality
- Determine head position
The complete Xcode workspace with the fully-functional app can be downloaded from here.
This is how the app looks like in action:
The app has been written in Xcode 13.2.1 Swift Language Version 5 and tested on an iPhone 11 Pro Max with iOS 15.2.1.
In the next section I am going to explain the features in more detail.
What is a Bounding Box? #
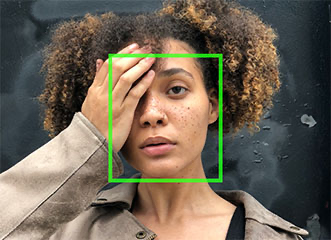
When we want to track the face of a person as a whole entity, we use the bounding box. We get these values straight from the detection algorithms and can takes them to visualise for example a green square around the face.
This is exactly what the sample app does. You can change the visualisation of the bounding box to your use case. Maybe you need another color or you need dashed lines instead of solid ones? This is an easy task with SwiftUI and the way I have decoupled the detection logic from its visualisation.
What are Face Landmarks? #
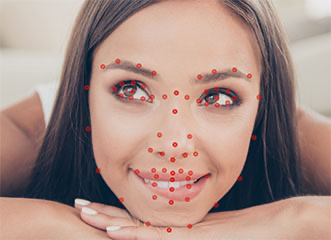
Instead of viewing the whole face as one entity, face landmarks give us more detail on specific features of the face. What we receive from the detection algorithms are sets of coordinates that depict facial features like the mouth, nose, eyes and so on.
What is Capture Quality? #
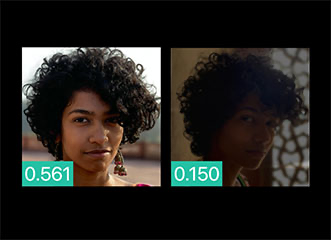
The Capture Quality indicator provides a specific value indicating on how good the images is to use for detection. The higher the value, the better the quality. The range is from 0.0 to 1.0.
This is especially useful when you have a series of images of the same subject, e.g. for selecting the best shot for further processing.
What are the different Head Positions? #
Another fascinating metric is the Head Position. Actually, we get three metrics, one for roll, one for yaw and one for pitch position of the head. The image below depicts the difference of these values.
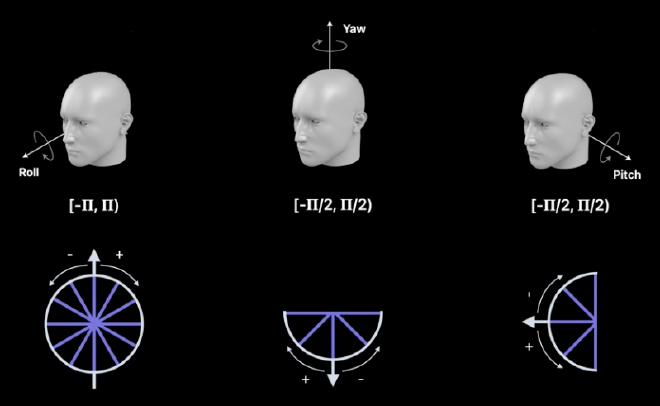
Now, that we know what the sample app does, we will learn how the its is organised for implementing these features.
App Architecture and Code Organization #
When doing the research for this article I came across many examples. Almost all of them had one and the same problem, the “Massive View Controller” anti-pattern.
On a high-level, the sample app has three processing steps:
- Capturing an image sequence
- Running the detection algorithms
- Visualising the result
In a “Massive View Controller” style application, almost all of these steps are implemented by one huge class. In classy UIKit apps, this is usually being done in UIViewControllers, therefore the name. Been there, done that.
What we want instead is good code design in the form of “Separation of Concerns”, where one class serves one specific purpose. We can also have a look at the SOLID principles from Uncle Bob (Robert C. Martin). The one we want is the “Single-Responsibility Principle”.
Therefore, my main goal for this project was to have a clear and concise code structure by separating the concerns capturing, detection and visualisation into distinct classes and connecting them via a pipeline-mechanism.
The project in Xcode is structure as follows:
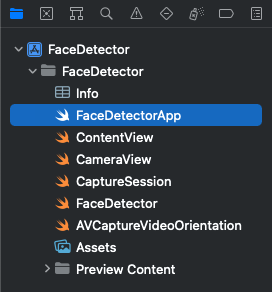
FaceDetectorApp: This is the entry point of our application which holds the application delegate. The application delegate is the place where we instantiate the different functional components of the application and connect them.ContentView: The top-most view for the application.CameraView: There is no native camera view for SwiftUI, yet. Therefore we need this helper class for wrapping the video preview layer which is native to UIKit.CaptureSession: As the name says, this class is responsible for capturing the image sequence aka the video feed.FaceDetector: This is where the magic happens! All the detection algorithms are being called from this class.AVCaptureVideoOrientation: A helper function for convertingUIDeviceOrientationtoAVCaptureVideoOrientationwhich is needed for the correct visualisation.
The classes on its own aren’t really useful. Therefore they need to connected. I prefer the Pipeline-Pattern. I love writing code by implementing the elements of a pipeline and then connecting them in a declarative style. That is why I have embraced Apples introduction of the Combine-Framework. I use it a lot in my code, but only where it makes sense and does not interfere with the clearness and understandability of the code.
The image below shows the elements of our pipeline and their input and output data types. All output variables are realised with Combine publishers (@Published) . The next pipeline element is then subscribing to this publisher.
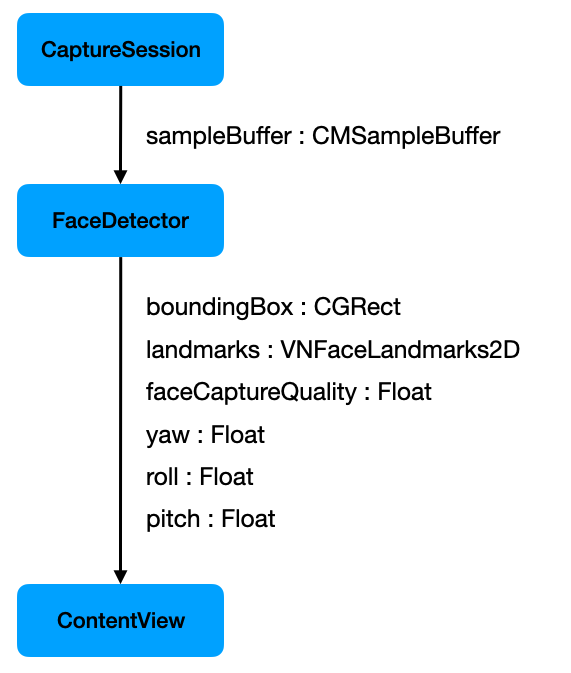
That’s about it on how the sample application has been structured to implement our required features.
It is now time to wrap it all up.
Conclusion #
This tutorial should have given you an in-depth look into what is necessary for implementing Face and Face Landmark Detection.
After starting out and explaining what kind of information we can gather from Apples algorithms, I have laid out in detail how I have structured the code of the sample application.
My main goal was to provide you with a clean code design to entangle the detection code into a simple to understand and reusable pipeline.
The complete Xcode workspace with the fully-functional app can be downloaded from here.
Thank you for reading!
- If you enjoyed this, please follow me on Medium
- Buy me a coffee to keep me going
- Support me and other Medium writers by signing up here
https://twissmueller.medium.com/membership