Change Data Capture with Debezium on Serverless Kafka
Databases are everywhere these days and with Change Data Capture one can turn these into a source for Event-Driven Systems without much effort.
There are tools like Debezium and Kafka Connect that bridge the gap between these two worlds and therefore turning a classical data-driven application into an event-driven application.
This article will provide a step-by-step tutorial for setting up Change Data Capture with Debezium on a MySQL database and Serverless Kafka on Upstash.
Having an event-driven system like depicted in the image below, we can react to any change of the database, whether it be a change in schema or of the data stored and feed this event to other systems.
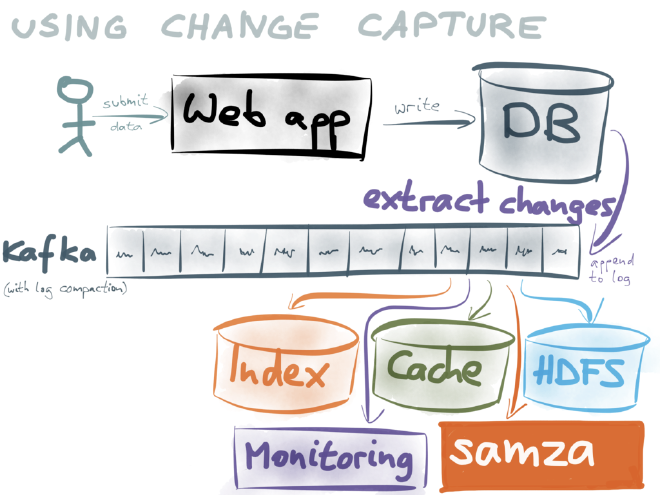
In the “old-days” we would have had to run batch-jobs to periodically run operations on a database in order to process the data stored. This came with many drawbacks. Those operations were expensive and came with a big delay in time.
Now we can run the processes with a smaller payload right when changes to the data occur.
In the next sections we get to know all the parts needed to implement such a system. Those are:
- Database (MySQL)
- Debezium
- Kafka (Upstash)
- Kafka Connect
Let’s start getting to know all the parts a bit better. Disclaimer: I won’t explain what a database is, but I will provide some pointers for all the other parts.
What is Debezium? #
Debezium is a tool, a platform, to monitor databases in order to be able to immediately react to changes in the database. Not only insert, update and delete events, but also schema changes for example can be detected.
It does so by applying a paradigm called “Change Data Capture” which is a design pattern applied to continuously monitor the state of a database and then react to it, by sending an event to Kafka.
What is Kafka? #
Kafka is a distributed event streaming platform. For this tutorial I am using Serverless Kafka provided by Upstash.
Upstash is an on-demand and pay-as-you-go solution. That means, no credit-card needed for small projects where you just try stuff. It’ll only cost when you need to up-scale your Kafka cluster and have a higher message or event exchange.
Check this article to get going with Upstash
https://itnext.io/first-steps-with-upstash-for-kafka-6d4d023da590
What is Kafka Connect? #
Kafka Connect is a framework to enable streaming between Kafka and other systems. Think of it as a bridge between Kafka and, as explained in this tutorial, a database.
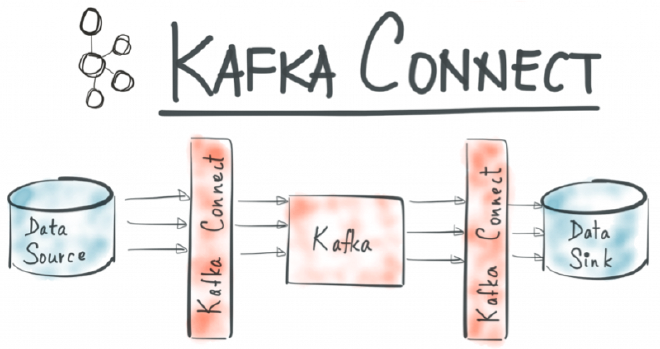
Basically we have all the pieces together.
Putting the Pieces Together #
Let’s lay everything out on the table of what we are going to use in this tutorial.
On the local machine, we are going to run a MySQL database and Kafka Connect with Docker-Compose.
Our Serverless Kafka is over at Upstash. We protect the communication between our local Kafka Connect and Upstah with SSL.
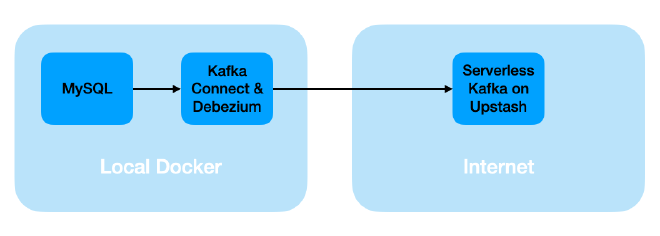
It is time to get all the parts working together. This is what we will do in the next sections.
These are the next steps:
- Setup a local database
- Configure our Kafka cluster and topics on Upstash
- Configure Kafka Connect and Debezium
- Create database, add some data and modify data
- Monitor all Kafka events related to above database operations
Setting up the Local Database #
It is time to get our hands dirty. We start by setting up the database first.
This is the service description for the MySQL database in the docker-compose.yml
mysql:
    image: mysql:latest
    container_name: mysql
    command:
      --server-id=12345
      --log-bin=mysql-bin
      --binlog-format=ROW
      --binlog-row-image=full
    networks:
      - tutorial
    environment:
      MYSQL_USER: foo
      MYSQL_PASSWORD: bar
      MYSQL_ROOT_PASSWORD: foobar
    volumes:
      - db_data:/var/lib/mysql
First start it with
docker-compose up mysql
Connect to the database with the console by
docker-compose exec mysql bash -c 'mysql -uroot -pfoobar'
We are ready to create the database from the MySQL-console.
create database testdb;
use testdb;
This is the database that we are going to change in this tutorial, capture the changes, transform them into an event and then sending them off to Kafka. Well, we only change or modify the database and its data, the rest is all handled automatically in the background.
We need to set some permissions for our user to monitor those changes.
GRANT REPLICATION CLIENT, REPLICATION SLAVE, LOCK TABLES ON *.* TO 'foo'@'%';

FLUSH PRIVILEGES;
The database is all set. Let’s head over to the other side of the pipeline which is our Kafka cluster.
Upstash Account and Configuration of Topics #
I am already assuming you have a running Kafka cluster “somewhere”.
Now it depends if your cluster allows the auto-generation of topics. If not, a couple of topics need to be created manually.
This is how it needs to look like on Upstash.
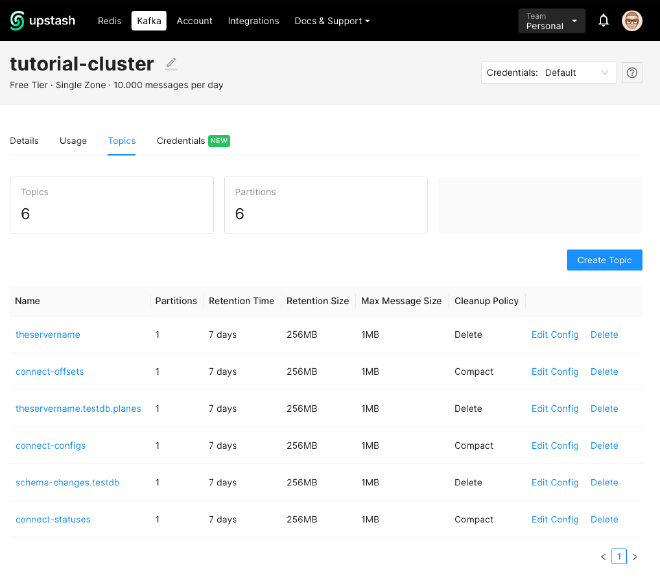
Now matter how your database is called, the following three topics are always needed:
- connect-offsets
- connect-configs
- connect-statuses
Please ensure they have a Cleanup Policy of “Compact”.
Then we have two topics which are specific to the database
- schema-changes.testdb
- theservername
And then there is one topic for our table that we will monitor but haven’t created, yet.
- theservername.testdb.planes
Those names are configured in different places.
The first three are provided in the configuration for Kafka Connect in our docker-compose.yml.
Configuring Kafka Connect with the Debezium Connector #
Finally, we put the connector in its place. This is how we configure Kafka Connect with Docker Compose:
connect:
    image: quay.io/debezium/connect:1.9
    container_name: connect
    ports:
      - "8083:8083"
    networks:
      - tutorial
    environment:
      BOOTSTRAP_SERVERS: ...

      CONNECT_SECURITY_PROTOCOL: SASL_SSL
      CONNECT_SASL_MECHANISM: SCRAM-SHA-256
      CONNECT_SASL_JAAS_CONFIG: ...

      CONNECT_PRODUCER_SECURITY_PROTOCOL: SASL_SSL
      CONNECT_PRODUCER_SASL_MECHANISM: SCRAM-SHA-256
      CONNECT_PRODUCER_SASL_JAAS_CONFIG: ...

      CONFIG_STORAGE_TOPIC: connect-configs
      OFFSET_STORAGE_TOPIC: connect-offsets
      STATUS_STORAGE_TOPIC: connect-statuses
Please make sure to replace the dots with your server name and credentials.
Let’s start it up with
docker-compose up -d connect
Finally we put the Debezium Connector in its place by issuing the following curl command
curl --location --request POST '127.0.0.1:8083/connectors' \
--header 'Content-Type: application/json' \
--data-raw '{
  "name": "tutorial-connector",
  "config": {
    "connector.class": "io.debezium.connector.mysql.MySqlConnector",
    "tasks.max": "1",
    "database.hostname": "mysql",
    "database.port": "3306",
    "database.user": "foo",
    "database.password": "bar",
    "database.server.id": "12345",
    "database.allowPublicKeyRetrieval":"true",
    "database.server.name": "theservername",
    "database.include.list": "testdb",
    "table.whitelist": "testdb.planes",
    "table.include.list": "testdb.planes",
    "database.history.kafka.bootstrap.servers": "...",
    "database.history.kafka.topic": "schema-changes.testdb",
    "database.history.consumer.security.protocol": "SASL_SSL",
    "database.history.consumer.ssl.endpoint.identification.algorithm": "https",
    "database.history.consumer.sasl.mechanism": "SCRAM-SHA-256",
    "database.history.consumer.sasl.jaas.config": "..."
    "database.history.producer.security.protocol": "SASL_SSL",
    "database.history.producer.ssl.endpoint.identification.algorithm": "https",
    "database.history.producer.sasl.mechanism": "SCRAM-SHA-256",
    "database.history.producer.sasl.jaas.config": "..."
  }
}'
Again, please ensure to replace the server name and your credentials.
Let’s check the connector with
curl --location --request GET '127.0.0.1:8083/connectors/tutorial-connector'
Everything is in its place now:
- The Kafka Cluster
- Kafka Connect and Debezium
- The MySQL Database
In the next section we are going to
- Create a table
- Add some data to the table
- Change the data in the table
- Monitor every action on the specific Kafka topic
Monitoring Database Operations in Kafka #
Finally, after putting all the pieces in its place we can create our table, add and modify some data and watch the events in Kafka.
We are going to listen in the Kafka topics with the kafka-console-consumer , for this we need to create a config file to put some properties into it. I have called this file upstash.config:
sasl.mechanism=SCRAM-SHA-256
security.protocol=SASL_SSL
	sasl.jaas.config=...
You can directly copy these values from Upstash
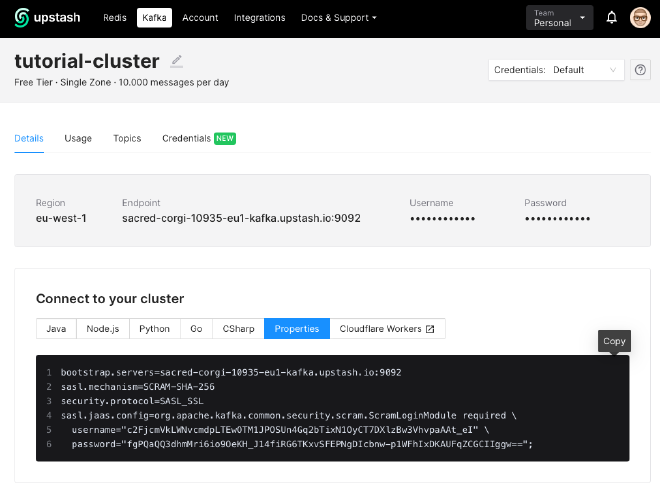
There are two topics that we are going to monitor:
- schema-changes.testdb
- theservername.testdb.planes
Let’s monitor the first one with the following command:
kafka-console-consumer --bootstrap-server ... --consumer.config upstash.config --from-beginning --topic schema-changes.testdb
In your MySQL-console you create a table
CREATE TABLE planes (color INT);
This should produce an event in Kafka that should look similar to this:
{
  "source" : {
    "server" : "theservername"
  },
  "position" : {
    "transaction_id" : null,
    "ts_sec" : 1652358237,
    "file" : "mysql-bin.000003",
    "pos" : 1624,
    "server_id" : 12345
  },
  "databaseName" : "testdb",
  "ddl" : "CREATE TABLE planes (color INT)",
  "tableChanges" : [ {
    "type" : "CREATE",
    "id" : "\"testdb\".\"planes\"",
    "table" : {
      "defaultCharsetName" : "utf8mb4",
      "primaryKeyColumnNames" : [ ],
      "columns" : [ {
        "name" : "color",
        "jdbcType" : 4,
        "typeName" : "INT",
        "typeExpression" : "INT",
        "charsetName" : null,
        "position" : 1,
        "optional" : true,
        "autoIncremented" : false,
        "generated" : false,
        "comment" : null,
        "hasDefaultValue" : true,
        "enumValues" : [ ]
      } ]
    },
    "comment" : null
  } ]
}
We start watching the second topic with this command:
kafka-console-consumer --bootstrap-server ... --consumer.config upstash.config --from-beginning --topic theservername.testdb.planes
Now, let’s add some data
INSERT INTO planes (color) VALUES (1);
You should be able to observe an event that looks like this (hint: scroll to the “payload” and check the “before” and “after”-fields).
{
    "schema": {
        "type": "struct",
        "fields": [
            {
                "type": "struct",
                "fields": [
                    {
                        "type": "int32",
                        "optional": true,
                        "field": "color"
                    }
                ],
                "optional": true,
                "name": "theservername.testdb.planes.Value",
                "field": "before"
            },
            {
                "type": "struct",
                "fields": [
                    {
                        "type": "int32",
                        "optional": true,
                        "field": "color"
                    }
                ],
                "optional": true,
                "name": "theservername.testdb.planes.Value",
                "field": "after"
            },
            {
                "type": "struct",
                "fields": [
                    {
                        "type": "string",
                        "optional": false,
                        "field": "version"
                    },
                    {
                        "type": "string",
                        "optional": false,
                        "field": "connector"
                    },
                    {
                        "type": "string",
                        "optional": false,
                        "field": "name"
                    },
                    {
                        "type": "int64",
                        "optional": false,
                        "field": "ts_ms"
                    },
                    {
                        "type": "string",
                        "optional": true,
                        "name": "io.debezium.data.Enum",
                        "version": 1,
                        "parameters": {
                            "allowed": "true,last,false,incremental"
                        },
                        "default": "false",
                        "field": "snapshot"
                    },
                    {
                        "type": "string",
                        "optional": false,
                        "field": "db"
                    },
                    {
                        "type": "string",
                        "optional": true,
                        "field": "sequence"
                    },
                    {
                        "type": "string",
                        "optional": true,
                        "field": "table"
                    },
                    {
                        "type": "int64",
                        "optional": false,
                        "field": "server_id"
                    },
                    {
                        "type": "string",
                        "optional": true,
                        "field": "gtid"
                    },
                    {
                        "type": "string",
                        "optional": false,
                        "field": "file"
                    },
                    {
                        "type": "int64",
                        "optional": false,
                        "field": "pos"
                    },
                    {
                        "type": "int32",
                        "optional": false,
                        "field": "row"
                    },
                    {
                        "type": "int64",
                        "optional": true,
                        "field": "thread"
                    },
                    {
                        "type": "string",
                        "optional": true,
                        "field": "query"
                    }
                ],
                "optional": false,
                "name": "io.debezium.connector.mysql.Source",
                "field": "source"
            },
            {
                "type": "string",
                "optional": false,
                "field": "op"
            },
            {
                "type": "int64",
                "optional": true,
                "field": "ts_ms"
            },
            {
                "type": "struct",
                "fields": [
                    {
                        "type": "string",
                        "optional": false,
                        "field": "id"
                    },
                    {
                        "type": "int64",
                        "optional": false,
                        "field": "total_order"
                    },
                    {
                        "type": "int64",
                        "optional": false,
                        "field": "data_collection_order"
                    }
                ],
                "optional": true,
                "field": "transaction"
            }
        ],
        "optional": false,
        "name": "theservername.testdb.planes.Envelope"
    },
    "payload": {
        "before": null,
        "after": {
            "color": 1
        },
        "source": {
            "version": "1.9.0.Final",
            "connector": "mysql",
            "name": "theservername",
            "ts_ms": 1652363759000,
            "snapshot": "false",
            "db": "testdb",
            "sequence": null,
            "table": "planes",
            "server_id": 12345,
            "gtid": null,
            "file": "mysql-bin.000003",
            "pos": 1153,
            "row": 0,
            "thread": 8,
            "query": null
        },
        "op": "c",
        "ts_ms": 1652363759766,
        "transaction": null
    }
}
Let’s do another test by modifying the data
UPDATE planes SET color=2 WHERE color=1;
This should produce the following. Again, check the “before” and “after”-fields in the “payload”-section.
{
    "schema": {
        "type": "struct",
        "fields": [
            {
                "type": "struct",
                "fields": [
                    {
                        "type": "int32",
                        "optional": true,
                        "field": "color"
                    }
                ],
                "optional": true,
                "name": "theservername.testdb.planes.Value",
                "field": "before"
            },
            {
                "type": "struct",
                "fields": [
                    {
                        "type": "int32",
                        "optional": true,
                        "field": "color"
                    }
                ],
                "optional": true,
                "name": "theservername.testdb.planes.Value",
                "field": "after"
            },
            {
                "type": "struct",
                "fields": [
                    {
                        "type": "string",
                        "optional": false,
                        "field": "version"
                    },
                    {
                        "type": "string",
                        "optional": false,
                        "field": "connector"
                    },
                    {
                        "type": "string",
                        "optional": false,
                        "field": "name"
                    },
                    {
                        "type": "int64",
                        "optional": false,
                        "field": "ts_ms"
                    },
                    {
                        "type": "string",
                        "optional": true,
                        "name": "io.debezium.data.Enum",
                        "version": 1,
                        "parameters": {
                            "allowed": "true,last,false,incremental"
                        },
                        "default": "false",
                        "field": "snapshot"
                    },
                    {
                        "type": "string",
                        "optional": false,
                        "field": "db"
                    },
                    {
                        "type": "string",
                        "optional": true,
                        "field": "sequence"
                    },
                    {
                        "type": "string",
                        "optional": true,
                        "field": "table"
                    },
                    {
                        "type": "int64",
                        "optional": false,
                        "field": "server_id"
                    },
                    {
                        "type": "string",
                        "optional": true,
                        "field": "gtid"
                    },
                    {
                        "type": "string",
                        "optional": false,
                        "field": "file"
                    },
                    {
                        "type": "int64",
                        "optional": false,
                        "field": "pos"
                    },
                    {
                        "type": "int32",
                        "optional": false,
                        "field": "row"
                    },
                    {
                        "type": "int64",
                        "optional": true,
                        "field": "thread"
                    },
                    {
                        "type": "string",
                        "optional": true,
                        "field": "query"
                    }
                ],
                "optional": false,
                "name": "io.debezium.connector.mysql.Source",
                "field": "source"
            },
            {
                "type": "string",
                "optional": false,
                "field": "op"
            },
            {
                "type": "int64",
                "optional": true,
                "field": "ts_ms"
            },
            {
                "type": "struct",
                "fields": [
                    {
                        "type": "string",
                        "optional": false,
                        "field": "id"
                    },
                    {
                        "type": "int64",
                        "optional": false,
                        "field": "total_order"
                    },
                    {
                        "type": "int64",
                        "optional": false,
                        "field": "data_collection_order"
                    }
                ],
                "optional": true,
                "field": "transaction"
            }
        ],
        "optional": false,
        "name": "theservername.testdb.planes.Envelope"
    },
    "payload": {
        "before": {
            "color": 1
        },
        "after": {
            "color": 2
        },
        "source": {
            "version": "1.9.0.Final",
            "connector": "mysql",
            "name": "theservername",
            "ts_ms": 1652363881000,
            "snapshot": "false",
            "db": "testdb",
            "sequence": null,
            "table": "planes",
            "server_id": 12345,
            "gtid": null,
            "file": "mysql-bin.000003",
            "pos": 1443,
            "row": 0,
            "thread": 8,
            "query": null
        },
        "op": "u",
        "ts_ms": 1652363881104,
        "transaction": null
    }
}
Here are a few more commands that you can try.
ALTER TABLE PLANES ADD NAME varchar(100);
DROP TABLE PLANES;
Cleanup #
Done with everything? Time to clean up.
On your local machine stop all containers and remove them:
docker-compose rm -fsv
You can also remove all unused volumes. Careful with this one, this might removed volumes that could still be used.
docker system prune -f --volumes
Finally, on Upstash. Go to “Datails” and scroll until the end where you find the option to delete the cluster.

Conclusion #
This article had one simple purpose: Providing a practical introduction to Change Data Capture with Debezium.
We started out with laying out all the parts we need to show what is needed to bridge the gap between our database and our Kafka cluster.
Then we filled the gap by putting Kafka Connect and Debezium in its place to turn the database into the source of an event-driven system.
Thank you for reading!
- If you enjoyed this, please follow me on Medium
- Buy me a coffee to keep me going
- Support me and other Medium writers by signing up here
https://twissmueller.medium.com/membership
This post contains affiliate links and has been sponsored by Upstash.